OK so that "new habit" was very short lived! lol
But any way I wanted to post on here about a giveaway The Fabric Shoppe is doing. Checkout their blog for all the details.
Tuesday, November 9, 2010
Saturday, October 23, 2010
FREE PATTERN: Wool Diaper cover/ Soaker
Ok so lots of people have been asking about my diaper soakers and what pattern I use. My pattern is a re-vamped version of one I found on the web. It is SUPER easy! Anyone with basic crochet knowledge can do it.
Materials:
-Worsted weight wool. Made up of at least 75% wool. Anything less will not hold moisture very well.
-Crochet hook. Any size will do. It is all up to you that is the beauty of this pattern!
First things First:
-Start off by measuring your baby.
Measurements needed are:
-Waist (start at belly button, go around waist, end at belly button.)
-Rise (start at belly button, go under baby, between legs and up back. stop where belly button would be on back.
-Thighs (measure chunkiest part of baby's thigh)
Once you have your measurements you can start crocheting.
For my example my measurements are:
Waist 18+
Rise 19-20
Thighs10-12


-ROW 3 &; ON: Repeat row 2 until you have a garment 1/4 the length of the waist measurement. Example: My diaper soaker is going to be 18 around the waist, so a 1/4 of that would be 4.5 inches. FASTEN OFF.

SECTION 2:

-ROW 2: AGAIN IN BACK LOOPS ONLY half double crochet in each stitch of previous row. Chain 2 turn
-ROW 3 & ON: AGAIN Repeat row 2 until you have another 1/4 the length of the waist measurement. for a TOTAL of 1/2 the total length of the finished garment. Example: My diaper cover needs a TOTAL waist measurement of 18inches so with section 2 done, My garment should now measure 9 inches wide 20 inches long.
SECTION 3: FINISHING SOAKER
Now some of you may wonder why I just don't start crocheting and finish when it is 9 x 20 instead of stopping and starting over like I do. This is why this is a Re-vamped pattern. The original pattern does that and what happens is you get one end of the soaker where the leg hole is stretchy and one end where the leg whole isn't. So the soaker does not have any give around the legs which can be uncomfortable for your little one. The way I do it allows both leg holes to stretch.


Materials:
-Worsted weight wool. Made up of at least 75% wool. Anything less will not hold moisture very well.
-Crochet hook. Any size will do. It is all up to you that is the beauty of this pattern!
First things First:
-Start off by measuring your baby.
Measurements needed are:
-Waist (start at belly button, go around waist, end at belly button.)
-Rise (start at belly button, go under baby, between legs and up back. stop where belly button would be on back.
-Thighs (measure chunkiest part of baby's thigh)
Once you have your measurements you can start crocheting.
For my example my measurements are:
Waist 18+
Rise 19-20
Thighs10-12
SECTION 1:
-ROW 1: Chain as many chains as needed for measurement of baby's rise. Since my soaker is needing a 19-20inch rise I crochet a chain until I had a 20 inch chain.

Once you have your chain the correct length: chain 2 more, then start half double crocheting in 2nd chain from hook. Once you finish the row. Chain 2 and turn.


-ROW 2: IN BACK LOOPS ONLY half double crochet in each stitch of previous row. Chain 2 turn

-ROW 3 &; ON: Repeat row 2 until you have a garment 1/4 the length of the waist measurement. Example: My diaper soaker is going to be 18 around the waist, so a 1/4 of that would be 4.5 inches. FASTEN OFF.

SECTION 2:
ROW 1: Start at Starting stitch of SECTION 1 Chain. Insert yarn in opposite side of half double crochets already made and attach with slip stitch. Like in the picture below. Chain 2. Work half double crochet down this side to the end. Chain 2 and turn.

-ROW 2: AGAIN IN BACK LOOPS ONLY half double crochet in each stitch of previous row. Chain 2 turn
SECTION 3: FINISHING SOAKER
-Fold the garment in half so that it measures 9 inches by 10inches. Slip stitch each side starting at the top of the soaker working your way down towards the fold. Stopping approx 5 inches from fold on each side.
Now you can either stop and be done with your soaker. or you can continue and add 2 rows of half double crochets around the leg openings like I did here to make the legs a little more profound.
To make drawstring: Just chain until long enough and use a yarn needle to pull through soaker.

To make drawstring: Just chain until long enough and use a yarn needle to pull through soaker.

Now some of you may wonder why I just don't start crocheting and finish when it is 9 x 20 instead of stopping and starting over like I do. This is why this is a Re-vamped pattern. The original pattern does that and what happens is you get one end of the soaker where the leg hole is stretchy and one end where the leg whole isn't. So the soaker does not have any give around the legs which can be uncomfortable for your little one. The way I do it allows both leg holes to stretch.
Here are some more pictures of my finished soaker. If you have any questions please comment or email me!


Please if you find mistakes in this pattern let me know. Also please add pictures of soakers you have made using my pattern.
*This soaker pattern is the property of iCreate Cuteness. Please do not sell the pattern as your own. If you recreate the soakers and sell them please make sure to reference iCreate Cuteness as the pattern maker. Thank you. :)
*This soaker pattern is the property of iCreate Cuteness. Please do not sell the pattern as your own. If you recreate the soakers and sell them please make sure to reference iCreate Cuteness as the pattern maker. Thank you. :)
Monday, October 11, 2010
My first pair of Longies! :-)
So I am finally done! It took me about 3 or 4 days, but here is my first attempt at making longies. I think thay came out really cute, if i do say so myself. I made these for a Challenge my etsy group CreateCrochet is having for the month of October. Because it is Breast Cancer Awareness month we had to make something that was all Pink. I have been wanting to make some pink longies for a long time, but have no little girl to wear them. So here was my excuse.
What do you guys thing of them?

 Front View Side View
What do you guys thing of them?


Thursday, September 30, 2010
Long time gone by... FREE Crochet Flower Pattern
Ok so I am a very bad blogger. lol I say I am going to post at least once a week, and well, as you can see that doesn't happen. :) To any one that this bothers I am really sorry. The kiddies (and my grandma) have been keeping me SO busy.
Lost of things have been going on around here since the last time I posted. Carter is now STANDING on his own and walking with the aid of the best $20 I ever spent, using the Playskool explore and grow step start walk and ride. Now it is shown on this site for $24.99 but I can tell you from experience, Target has it for $18 and change plus tax. Carter loves this toy. Funny I had something like this for my other little ones and they never took to it, but he can't stop. lol
Also new, Xander turned 5 September 8th! Happy late birthday to my bubbie. Katie turned 11 on the 23rd! I can't even believe it has been that long. It really does seem like yesterday I was in labor in the hospital with these two. It is so amazing how time just flies right by you. Especially when you don't want it to.
And another two milestones for the kiddies. Xander lost his first tooth last week, and then this past Monday, Myleigh lost her first tooth.! The same exact tooth Xander lost. LOL I will have to post some toothless smiles up here tomorrow. I promise.
Ok, now that I have caught all of you up on everything I can think of right now, on to the pattern I promised. It is nothing spectacular, but I have been searching for just a simple flower pattern to do for some small items for the girls. All the patterns I find, I either can't figure out or they are for HUGE flowers. I just wanted a small little dainty looking daisy. And most of all I wanted it simple!!! So I was sitting there this evening wondering what to do with some excess yarn I had after making a soaker and I just started practicing. Here is what I came up with.
Chain 2
R1: do 5 single crochet(sc) in second hole from hook. Join in top of first sc.
 R2: *slip stitch(slst) in next sc, half double crochet(hdc) in same stitch, double crochet(dc) in same stitch, then hdc again in same stitch. repeat from * in next stitch and then again in next 3 stitches around for a total of 5 petals. Slst in starting sc. Fasten off.
Simple right. I know. lol This flower will not be very big but you can adjust size using various sized needles and yarn weights.
Please post if you have any questions or suggestions for this pattern.
Lost of things have been going on around here since the last time I posted. Carter is now STANDING on his own and walking with the aid of the best $20 I ever spent, using the Playskool explore and grow step start walk and ride. Now it is shown on this site for $24.99 but I can tell you from experience, Target has it for $18 and change plus tax. Carter loves this toy. Funny I had something like this for my other little ones and they never took to it, but he can't stop. lol
Also new, Xander turned 5 September 8th! Happy late birthday to my bubbie. Katie turned 11 on the 23rd! I can't even believe it has been that long. It really does seem like yesterday I was in labor in the hospital with these two. It is so amazing how time just flies right by you. Especially when you don't want it to.
And another two milestones for the kiddies. Xander lost his first tooth last week, and then this past Monday, Myleigh lost her first tooth.! The same exact tooth Xander lost. LOL I will have to post some toothless smiles up here tomorrow. I promise.
Ok, now that I have caught all of you up on everything I can think of right now, on to the pattern I promised. It is nothing spectacular, but I have been searching for just a simple flower pattern to do for some small items for the girls. All the patterns I find, I either can't figure out or they are for HUGE flowers. I just wanted a small little dainty looking daisy. And most of all I wanted it simple!!! So I was sitting there this evening wondering what to do with some excess yarn I had after making a soaker and I just started practicing. Here is what I came up with.
Materials:
~Any size hook-depending on how big/small you want the flower. My favorite size is a G so that is what I used.
~Any type of yarn to match size/hook. I used worsted weight wool
Pattern:
Chain 2
 R2: *slip stitch(slst) in next sc, half double crochet(hdc) in same stitch, double crochet(dc) in same stitch, then hdc again in same stitch. repeat from * in next stitch and then again in next 3 stitches around for a total of 5 petals. Slst in starting sc. Fasten off.
Simple right. I know. lol This flower will not be very big but you can adjust size using various sized needles and yarn weights.
The flowers came out cute and I think they will be perfect to applique a pair of Myleigh's jeans.
Good night.
Thursday, July 15, 2010
Homemade Cupcakes and Banana Butter Cream Glaze
So I am now trying my hand at making things homemade when possible. So the other day after watching Cupcake Wars, I had to try it. I had to make some homemade cupcakes! So I quickly searched the Internet and found this recipe for homemade cake mix. The I found other links for yellow cake and chocolate cake. Well, today I finally got a chance to make the cake mix and yellow cupcakes. And they came out awesome! LOL I also decided to make frosting for them. After a little bit of experimentation I came up with this recipe for a Banana Butter Cream Glaze that went oh so well with my homemade cupcakes. :)
Banana Butter Cream Glaze
What you need:
1 medium to large banana
1/4 cup milk
1/4 cup butter (softened)
2 cups of confectioners sugar
What you do:
First, take a banana, cut into 1 inch pieces and then puree in a food processor.
Next, mix softened butter and milk on low. Slowly add confectioners sugar. Once all they are mixed, add pureed banana and mix on medium until well blended.
Saturday, July 10, 2010
The baby is crawling!
For months, about 3 to be exact, Carter has been teasing us with his crawling stance and the elusive shaking back and forth. We've all been watching him like hawks while he is playing on the ground, just waiting for the fateful moment when he actually start crawling. Well, for a few days now, when he thinks no one is looking he has been crawling an inch or two. Someone will see him out of the corner of their eye and of course excitedly tell someone who hurries over just to be disappointed because Carter has stopped and will not repeat his new found talent. That all changed this morning. He was sitting on the floor playing when Xander decided to sit down a few feet way to admire his box of Yugio cards. Carter caught a glance of Xander's cards and took off straight for them. I was in the kitchen and Chad who was sitting with the boys yelled for me. I saw a slight crawl and then hurried over with my iPhone to get a video. It took a while but I finally got a little bit on tape! So here it is. Along with some other things also going on in the living room this morning.
Friday, July 9, 2010
Tutorial for Pee Pee Tee Pees
Pee Pee Tee Pees are so cute and they make great baby shower present for any mommy expecting a little boy.
Pee Pee Tee Pees are just what their name says. They are little tee pees you put over you little man's pee pee to stop him from pee peeing on you during a diaper change.
I love them and they are really easy to make.
What you will need:
Sewing machine
Thread
Flannel Fabric and
A pen
A protractor, compass, or an object in the shape of a LARGE circle (to trace)
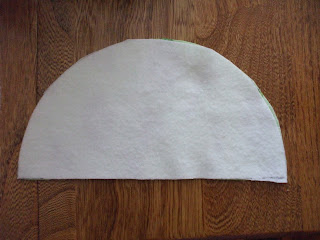
The first thing you need to do is make the pattern. It is nothing more then a large half circle about 6 inches in length across the bottom. A protractor would do the trick perfectly. If you do not have one you can just trace a large circle about 6 inches in diameter and the fold it in half.
Next you need to iron the fabric. Please make sure you wash and pre shrink it.
Then you track you pattern onto the fabric. You need to pieces of the pattern for each tee pee. I usually use a pattered flannel for the top piece and a solid for the inner piece.

Here is a picture of how you can place your pattern on the fabric. I can usually get about 4 - 6 tee pees out of a 1/4 yd of flannel.
Next, cut your fabric. Once all your fabric is cut layer it WRONG sides together and pin it.


Pee Pee Tee Pees are just what their name says. They are little tee pees you put over you little man's pee pee to stop him from pee peeing on you during a diaper change.
I love them and they are really easy to make.
What you will need:
Sewing machine
Thread
Flannel Fabric and
A pen
A protractor, compass, or an object in the shape of a LARGE circle (to trace)
The first thing you need to do is make the pattern. It is nothing more then a large half circle about 6 inches in length across the bottom. A protractor would do the trick perfectly. If you do not have one you can just trace a large circle about 6 inches in diameter and the fold it in half.
Next you need to iron the fabric. Please make sure you wash and pre shrink it.
Then you track you pattern onto the fabric. You need to pieces of the pattern for each tee pee. I usually use a pattered flannel for the top piece and a solid for the inner piece.

Here is a picture of how you can place your pattern on the fabric. I can usually get about 4 - 6 tee pees out of a 1/4 yd of flannel.
Next, cut your fabric. Once all your fabric is cut layer it WRONG sides together and pin it.


Now it is time to sew. Set your sewing machine to the number 2 or 3 and on a straight stitch.


Start sewing your tee pee in the center of the straight part of fabric to the corner and then work your way around until you you get to the next corner. Sew past the next corner on to the straight edge again for about an inch or two. Make sure you leave about an inch between the start seem and the ending seem to turn the fabric right side out.


After you have completed sewing all your half circles, cut the corners of the fabric off at each end. Be careful not to cut too close to the seam. Then turn fabric right side out and press flat with the iron making sure the unsewn opening is folded in.

Next, sew around the circular portion of the half circle close to the edge to ensure the seams do not come undone at a later time.

Finally, fold your half circle in half, right sides together, to form a triangle. Set the sewing machine to a zig zag stitch and sew over the flat, straight, edge As pictured.

The Picture shows a straight stitch, but trust me a zig zag works much better!


Then, clip all the loose threads and turn right side out.

And there you have it! A pee pee tee pee. You can also make these with only one layer of flannel. I like to use two for the added absorption.
Good luck and please post your comments and stories!
*Can't sew? I sell these on Ebay! Ebay seller Creating*Cuteness
Monday, June 21, 2010
Summer trip, 4 kids 1 parent on an airplane, and moving...
WOW! I never get on here. lol
HAPPY SUMMER SOLSTICE!!!
Well, today is the official first day of summer, but for my kiddies the first day of summer was May 22, the last day of school being the 21st. And boy have we been busy since then! May 22 we went to my husband's family reunion. It is the longest running family reuinion in U.S. History. We traveled from Louisiana to Panama City, FL for it. It was only a 4 hour trip, but it seemed like forever. My Father-in-law rented a 15 passenger van and we had it packed full of people. Me, my husband, our 4 little ones, my FIL, his wife, 3 family friends, and my Sister -in-law and her 2 children. And then later that day we went and had a visit with my hubby's Grandma Miller. We hadn't seen her since Myleigh was 1. She hadn't even met little Carter yet.
 Here's a picture of us all. From left to right, top row: My nephew, Austin, my SIL, Missy, my neice, Savannah, Katie, Me, Chad. Second row: Xander, Granny Miller, Carter, and Myleigh.
 The next day, yes we drove home to Louisianna that night, we spent packing out moving truck. Missy and her boyfriend, Chris came over to help. Then Monday we finished some little things and Tuesday, I bravely took ALL FOUR CHILDREN by myself on an airplane to Georgia where we had a 2 hour layover and then again on an airplane to New York. And yes they were perfect angels!!! I could not beleive it. However that did not last for the 3 hour ride back to Pennsylvania. But really, can you blame them? It is tough being good in public all day. LOL
We have been here for almost 3 weeks now, we are getting settled in still. The kids love being closer to my parents.
I have also been working on tons of stuff to put on etsy and in my blog. I will be posting alot more. So keep a look out!
Subscribe to:
Comments (Atom)