So I am now trying my hand at making things homemade when possible. So the other day after watching Cupcake Wars, I had to try it. I had to make some homemade cupcakes! So I quickly searched the Internet and found this recipe for homemade cake mix. The I found other links for yellow cake and chocolate cake. Well, today I finally got a chance to make the cake mix and yellow cupcakes. And they came out awesome! LOL I also decided to make frosting for them. After a little bit of experimentation I came up with this recipe for a Banana Butter Cream Glaze that went oh so well with my homemade cupcakes. :)
Banana Butter Cream Glaze
What you need:
1 medium to large banana
1/4 cup milk
1/4 cup butter (softened)
2 cups of confectioners sugar
What you do:
First, take a banana, cut into 1 inch pieces and then puree in a food processor.
Next, mix softened butter and milk on low. Slowly add confectioners sugar. Once all they are mixed, add pureed banana and mix on medium until well blended.
Thursday, July 15, 2010
Saturday, July 10, 2010
The baby is crawling!
For months, about 3 to be exact, Carter has been teasing us with his crawling stance and the elusive shaking back and forth. We've all been watching him like hawks while he is playing on the ground, just waiting for the fateful moment when he actually start crawling. Well, for a few days now, when he thinks no one is looking he has been crawling an inch or two. Someone will see him out of the corner of their eye and of course excitedly tell someone who hurries over just to be disappointed because Carter has stopped and will not repeat his new found talent. That all changed this morning. He was sitting on the floor playing when Xander decided to sit down a few feet way to admire his box of Yugio cards. Carter caught a glance of Xander's cards and took off straight for them. I was in the kitchen and Chad who was sitting with the boys yelled for me. I saw a slight crawl and then hurried over with my iPhone to get a video. It took a while but I finally got a little bit on tape! So here it is. Along with some other things also going on in the living room this morning.
Friday, July 9, 2010
Tutorial for Pee Pee Tee Pees
Pee Pee Tee Pees are so cute and they make great baby shower present for any mommy expecting a little boy.
Pee Pee Tee Pees are just what their name says. They are little tee pees you put over you little man's pee pee to stop him from pee peeing on you during a diaper change.
I love them and they are really easy to make.
What you will need:
Sewing machine
Thread
Flannel Fabric and
A pen
A protractor, compass, or an object in the shape of a LARGE circle (to trace)
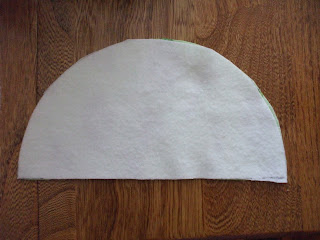
The first thing you need to do is make the pattern. It is nothing more then a large half circle about 6 inches in length across the bottom. A protractor would do the trick perfectly. If you do not have one you can just trace a large circle about 6 inches in diameter and the fold it in half.
Next you need to iron the fabric. Please make sure you wash and pre shrink it.
Then you track you pattern onto the fabric. You need to pieces of the pattern for each tee pee. I usually use a pattered flannel for the top piece and a solid for the inner piece.

Here is a picture of how you can place your pattern on the fabric. I can usually get about 4 - 6 tee pees out of a 1/4 yd of flannel.
Next, cut your fabric. Once all your fabric is cut layer it WRONG sides together and pin it.


Pee Pee Tee Pees are just what their name says. They are little tee pees you put over you little man's pee pee to stop him from pee peeing on you during a diaper change.
I love them and they are really easy to make.
What you will need:
Sewing machine
Thread
Flannel Fabric and
A pen
A protractor, compass, or an object in the shape of a LARGE circle (to trace)
The first thing you need to do is make the pattern. It is nothing more then a large half circle about 6 inches in length across the bottom. A protractor would do the trick perfectly. If you do not have one you can just trace a large circle about 6 inches in diameter and the fold it in half.
Next you need to iron the fabric. Please make sure you wash and pre shrink it.
Then you track you pattern onto the fabric. You need to pieces of the pattern for each tee pee. I usually use a pattered flannel for the top piece and a solid for the inner piece.

Here is a picture of how you can place your pattern on the fabric. I can usually get about 4 - 6 tee pees out of a 1/4 yd of flannel.
Next, cut your fabric. Once all your fabric is cut layer it WRONG sides together and pin it.


Now it is time to sew. Set your sewing machine to the number 2 or 3 and on a straight stitch.


Start sewing your tee pee in the center of the straight part of fabric to the corner and then work your way around until you you get to the next corner. Sew past the next corner on to the straight edge again for about an inch or two. Make sure you leave about an inch between the start seem and the ending seem to turn the fabric right side out.


After you have completed sewing all your half circles, cut the corners of the fabric off at each end. Be careful not to cut too close to the seam. Then turn fabric right side out and press flat with the iron making sure the unsewn opening is folded in.

Next, sew around the circular portion of the half circle close to the edge to ensure the seams do not come undone at a later time.

Finally, fold your half circle in half, right sides together, to form a triangle. Set the sewing machine to a zig zag stitch and sew over the flat, straight, edge As pictured.

The Picture shows a straight stitch, but trust me a zig zag works much better!


Then, clip all the loose threads and turn right side out.

And there you have it! A pee pee tee pee. You can also make these with only one layer of flannel. I like to use two for the added absorption.
Good luck and please post your comments and stories!
*Can't sew? I sell these on Ebay! Ebay seller Creating*Cuteness
Subscribe to:
Comments (Atom)