Ok so as some of you may or may not know Facebook has changed their rules and added more rules to how contest are done on a fan page. With the new rules a page owner can still so a contest or giveaway, but only if they are using a FB app. which unfortunately is UNBELIEVABLY expensive! So from now on all give aways done by Creating Cuteness will be hosted on my blog page in correlation with either my flicker or photbucket account. The contest will be posted on the blog when it starts and stops along with all rules. The photos of the items will be posted on the picture website. I am sorry that this will be more work for both myself and the entrants, but this is how it must be done. I will be posting information regarding our 1000 FAN GIVEAWAY either tonight or tomorrow.
Friday, May 13, 2011
Saturday, April 16, 2011
How to die Wool yarn with Kool Aid
So I love do all sorts of crafts, sewing, crocheting, and now knitting!
I love all the different dyed yarns you can get, they are gorgeous but alas, I can't afford them! So I have an inexpensive way to make your own beautifully died yard your self.

 -Wool yarn, as close to 100% wool as you can get. Remember only the wool will take the color so if it is 50% wool 50% cotton rest assured the dye will wash out of the cotton. I like Lion's Brand Fisheman's Wool. It is 100% virgin wool. It is soft and great for felting too! They sell it for about $10 for 8 oz. But if you a savvy shopper like me and go to AC Moore when they email you your 50% off coupon you can get it for $5!

 -Now I am going to show you how to dye a solid color and how to dye multi colors. I am using this dye to make my son some shorties so I need solid trim and the multi colored body of the short. In order to do that I need about 2oz of yarn for my trim. So I and wrapping around my chair for a few, them i am going to weigh my yarn and when my yarn only weighs 6 oz I will cut off what I have and put it o the side. Then I Will start wrapping the remaining 6oz for the multi colored yarn.


 Take some gasses, the ones pictured were too small so I had to get bigger ones.


I love all the different dyed yarns you can get, they are gorgeous but alas, I can't afford them! So I have an inexpensive way to make your own beautifully died yard your self.
What you need:

 -Wool yarn, as close to 100% wool as you can get. Remember only the wool will take the color so if it is 50% wool 50% cotton rest assured the dye will wash out of the cotton. I like Lion's Brand Fisheman's Wool. It is 100% virgin wool. It is soft and great for felting too! They sell it for about $10 for 8 oz. But if you a savvy shopper like me and go to AC Moore when they email you your 50% off coupon you can get it for $5!
-Kool Aid, what ever colors you want. For this tutorial I used berry blue, lemon lime, and orange.
- a pot or 2
-some baby soap
- and Saran wrap and a turkey baster or syringe if you are going to make yarn that is multi colored.
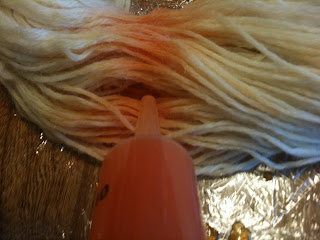
-Start off by unraveling your yarn and making it into a skein. You can do this by wrapping it around a chair.
Start at one end of the chair hold the yarn in place and start wrapping as pictured. Make sure you secure the end piece of the yarn under a few of the pieces wrapped around so you can let go. :)


 -Now I am going to show you how to dye a solid color and how to dye multi colors. I am using this dye to make my son some shorties so I need solid trim and the multi colored body of the short. In order to do that I need about 2oz of yarn for my trim. So I and wrapping around my chair for a few, them i am going to weigh my yarn and when my yarn only weighs 6 oz I will cut off what I have and put it o the side. Then I Will start wrapping the remaining 6oz for the multi colored yarn.

Once you have your yarn wrapped you also need to tie some waste yarn around in certain pints of your skein so it does not tangle.
So here are the 2 skeins I have.

The next step is to wash them. I fill my sink up with warm tap water and some baby soap. Swish them around a little, careful not to do it too much or your yarn will felt. Then I rinse them in warm water. And them fill the sink up with clean warm water and let the yarn soak for about 45 minutes to an hour. this will get it ready fr dying.
Once time is up carefully wring out your yarn by squishing it gently.

I am going to go over one color dye first.
Take your pot, since you are using Kool aid you can use a pot that you would normally cook with.
***PLEASE NOTE: If you are using a chemical dye you need to use a special pot!
Add some warm water to the pot and mix in the kool aid. The amount of water to kool aid ratio does not matter. The wool will soak up all the color. For a light color, use less kool aid, and for a darker color use more, or mix colors.
I used one packet of lemon lime.

Add your yarn, place pot on stove on medium high heat and cover. Once you get some good steam going in the pot, lower the heat to a simmer. Let simmer for about 45 minutes.
Now just a note, once i get my yarn ready for the pot, I very carefully cut the waste yarn off. If you keep it on you will get white spots where the dye won't take. Just be careful not to tangle your yarn.

Once the time is up your done! You will see the water is clear, but the yarn will be dyed, let it cool.

Once your yarn is cooled, again gently wring it out. Then place it some where safe to dry.
Now Multi color dyed yarn is a little different.
Take some saran wrap and place it down on your work area. It needs to be a pretty big sheet. i usually use about 3-4 pieces that are about 3 feet long each. Make sure you over lap them.

Fill each glass with about 8 oz of arm water. Ad your kool aid. One color per glass.
I put green in one, blue in one, orange in another, and then 1/2 a packet each of blue and green in another.
I also have a 5th glass with clean water to wash out my syringe.

Lay your yarn out on to the saran wrap in a oval shape. Take your syringe, fill it with the color of your choice and then squirt it on to the yarn in a back and forth motion. Make sure you squirt the underside too. Then you can push on the yarn with your fingers to make sure it gets the color where you want it. Rinse out your syringe and start with the next color.


Make sure you leave a little gap in between colors because they will spread.
Also you may notice you may get some water build up. Just use a paper towel to blotch it up.
Once you are done adding your colors wrap your yarn in the saran wrap. Take one long side, wrap it to the middle, Take the other long side and wrap it to the middle. then fold over the ends.


Now this is going to go in a pt too, but a different way.
If your lucky and have a spaghetti pot, one that has a pot with a colander built in, that is perfect. But if not, you need to take a big pot, Fill it up with about 2 inches of water, then take a smaller pot that will fit inside and put your saran wrapped yarn in it then put it in the bigger pot and cover.
Once again you will do medium high till the steam builds up then simmer for 45 minutes.
***Please Note: When your yarn is done, please make sure you let it cool. If you open the saran wrap before the yarn is cooled you will get burned by the steam! Trust me I did it. LOL
Once it is cooled rinse and dry. Voila!
There you have it. Now go knit or crochet something cute!

If you have any questions or if something is not clear please comment and I will be glad to help!
Sunday, January 16, 2011
Gearing up for Valentines Day
Just wanted to let ya'll know That i have stocked some items in my ETSY store for the up coming holiday. Check them out they are super cute and the prices are great.
Subscribe to:
Comments (Atom)